When I first started doing nail art, I wanted to buy anything and everything that could help me create all of the ideas I had in my head. But when I stopped to think of alternatives to these tools and MacGyvering things I had on hand and around my house, I no longer had a need to sit on Amazon or eBay for hours. I could go shopping in my very own home, and who doesn’t love that?
Here are simple alternatives to popular and basic nail art tools/tricks that can be found in your home. Who knew!
 Dotting Tool—Do you want to achieve those perfect little cookie cutter dots without the frustration? Using one of the tips of a bobby pin is the perfect alternative. Just bend the pin open and you’re done. Pretty simple right? Since it is made of metal it is also reusable for future nail art. Given the rounded ends, using a bobby pin tends to give you larger/medium sized dots.
If you do not have a bobby pin handy, or want to create dotting tools of different sizes, a toothpick or needle are also great alternatives. I like to file the toothpick just a bit to avoid having the pointed tip drag or indent any polish when using it. Depending on how much you file, you can create different sizes as well. I also like using a needle at times to create the tiniest specks. I am a a very detail oriented person, so being able to control dot and dot sizes when painting without the fuss is great. Having all three of these handy gives you a pre-made dotting kit essentially.
TIP: Not only can tool size help you create different dots, but the paint amount on the tip or hand and finger pressure when dotting can help you create dots in all sizes without switching back and forth between different sized tools.


Striper/Fine Brush—If you don’t already have a polish with a striper brush on hand, paint brushes of smaller widths/ longer lengths can be a good alternative. I prefer custom cutting brush sizes depending on my needs, it all depends on yours!
Everyone is different when it comes to painting technique and style, so I suggest seeing how you work with different brush types—Do you prefer a longer or shorter brush handle? Do you work better with a super thin brush or do you like working with a wider brush with a super fine tip instead? I have brushes varying from just cutting out a few bristles to cutting it down to just a few hairs left on the brush.
TIP: Because you’ll want a controlled, clean cut, be sure to cut slowly and watch your fingers when cutting! You may not even realize your regular grip/strength and could potentially cut the entire brush if you’re not careful. Go slow! If you already have polishes with striper brushes, but want to create smaller/finer ones, you can apply the same cutting technique as well.
 Clean Up/Correction Brush—Just like coloring, sometimes it’s hard to stay within the lines, or in this case on just your nail. A small, fine bristle brush is perfect for the job. The brush I currently use the most is actually a random free brush included in a package of make-up sponges I purchased forever ago. Who would have thunk. A lot of make-up kits or tool purchases may include a small brush like this, and it’s great because of the size and bristle type.
Another quick fix for cleaning up stray polish that you can find in your bathroom cabinet are Q-tips. I use these often for make-up application clean up, why not nails? With angled Q-tips available, those may help even more to get closer to the nail and between the cuticle and nail for an easy clean up.
TIP: Doing one clean stroke using a brush or Q-tip on the sides and on top of the nail can help your final paint job appear more clean and uniform. Going back and forth around the nail can potentially cause your polish to smear or cause pigment to get onto the cuticle (especially red polish, eep!).

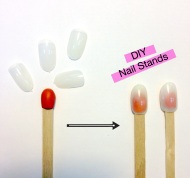

Nail “Stand”—If you have started venturing into painting press on/false nails, thin popsicle sticks and removable adhesives/putty are great for holding the nail onto a sturdy surface for painting. Here I am using Elmer’s Tack, but any reusable adhesive will work. Roll a pea size or smaller amount between your fingers to get it pliable and put it onto the tips of the popsicle stick. The press on nail should stick right on and have enough grip that it doesn’t slide when you try to paint it.
TIP: Use both ends of the popsicle stick for more nails! Make the most of what you have. If I am creating a complete press on set, I like to use 5 sticks total, having one side hold the nails of one hand, and one side hold the other. Just be sure to keep track of which ones you are working on so you don’t get them mixed up!
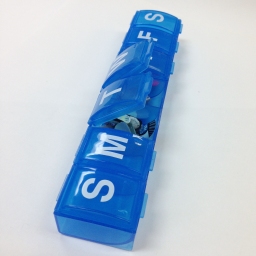 Nail Art Organizer—If you’ve started working with press on nails, I’m sure you’ve collected quiet a bit (it’s kind of addictive isn’t it?). Don’t let your lovely work get lost! A pill organizer is a great way to store and organize loose false/press on nails. Here I have a medium/larger sized organizer that fits all of the different size nails I have. The multiple compartments allow for options in your organizing—Do you want to sort them by size, shape, color, design?
TIP: Not only is this a great way to organize and store nails but it is also great for travel! It is light, smaller than other organizing containers and gets the job done. What’s not to love? Just be careful to not drink them in place of your daily vitamins!

Images by Kim Bui.
Love DIY? So do we! Check out more Luna Luna articles on how to make your own awesome paperclip earrings or ruby red lipstick!
____
Kim Bui is a freelance artist & designer from Norfolk, Va. She is a recent graduate of Pace University trying her hand at a little bit of everything; illustration, art direction & nail art. She has a passion for print design and finding the perfect pen. @Sincerelykimbui

Kim this is so cool! You gave me a lot of ideas!
Thanks Amelia!! So glad you like them ^_^
Love the bobby pins as dotting tools! Amazing tips in this post xx
Thank you!! I’ll be trying to post more DIY & tricks for nails and nail art methods. Be sure to check back every other Monday for nail posts! xx
Reblogged this on Love Thy Nails and commented:
SOO CREATIVE I LOVE LOVE LOVVVEE!!
Thank you for the reblog! We love love love hearing things like this & hearing from you. Let us know if you try any of these DIYs out and feel free to let us know on twitter & Facebook @LunaLunaMag.
The pill organiser is a great idea! Never thought about that. You could totally paint it and make it all funky and stuff. Yeah!
You definitely could! We’d love to see if you try it out ;) Feel free to let us know via Twitter or Facebook @LunaLunaMag! p.s LOVING your nail art designs! xx